REM4P PC

Guide
 Welcome to the REM4P PC guide!
Use the navigation bar on the left to scroll through each section of the guide or use the search bar found just above.
Welcome to the REM4P PC guide!
Use the navigation bar on the left to scroll through each section of the guide or use the search bar found just above.QuickStart
The following sections cover the basics on how to get setup and running using REM4P PC.
Make sure to check the input guide once you’re comfortable with the basics to learn about advanced axis controls, mouse calibration and scripts.
Logging In
When Starting REM4P PC for the first time you will see the login window shown below.

Simply enter the same login details you use to login to the store and press ‘LOGIN’ to proceed.
If you have forgotten your password click the ‘Forgot Password’ link or go HERE to reset.
Drivers
Drivers
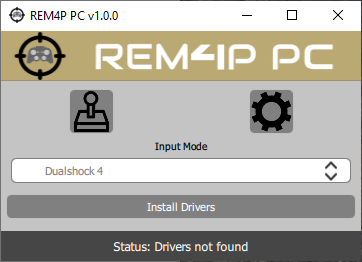
Before you can start using REM4P PC you need to install the required drivers, upon logging in you’ll see the REM4P window with an ‘Install Drivers’ button.
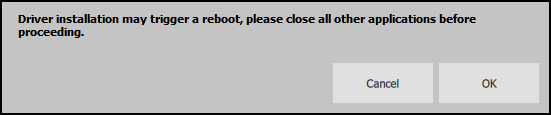
Before installing drivers you will be warned that it will likely force a reboot. CLOSE ALL OTHER APPLICATIONS BEFORE PROCEEDING
Once your pc has rebooted, launch REM4P PC again and you should be presented with ‘Select Game…’ and ‘Status: Waiting for game…’. If not, please refer to the troubleshooting section.
Game Settings
For optimal mouse input is it highly recommended you adjust you game input settings first.
Ideally you want sensitivity at maximum, 0 deadzone and when possible, linear acceleration.
For reference, these are the optimal settings for Modern Warfare:

From top to bottom you can see
- Deadzone set to 0
- Stick sensitivity for both X and Y axis is set to maximum
- ADS (Aiming down sight) sensitivity is set to max but this can be adjusted to preference
- Aim response curve is the acceleration curve, this has been set to linear to achieve the closest 1:1 input for mouse
- Aim assist has been set to precision with scale disabled, this is preference and can be adjusted per game to your preference
Game Selection
Game Selection
Before you continue please note that some games do not accept multiple gamepads, this means that if you have a real Xbox or Dualshock controller connected to your pc then REM4P will not work. Please disconnect these controllers before proceeding.
Before you can use REM4P PC for input you have to select a game window:
- Start the game you wish to play
- It is highly recommended at this point to adjust your games controller settings to max sensitivity if you have not yet done so.
- Alt + Tab back to REM4P PC
- Click the ‘Select Game’ button and select the game window from the list. You can double click or highlight and click the OK button.
- REM4P PC should now display ‘Status: Active’.
- Alt + Tab back to the game and use the input hotkey (Alt + C by default) to enable gamepad input and capture your keyboard/mouse
NOTE: When enabled REM4P PC will capture all keyboard/mouse input so your cursor will not move and your keyboard will not respond to normal input such at Alt+Tab, Windows Key etc… You must use the input hotkey to disable REM4P PC and gain control of your keyboard/mouse again.
As a backup you can exit the game to disable input or use the backup hotkey ALT + F12
Controllers, Keyboard & Mouse input
Input Capture
In order to use Keyboard and Mouse input you have to ‘capture input’, this means you need to use the capture hotkey to grab and ungrab keyboard and mouse input.
By default the capture toggle hotkey is assigned to ALT + C.
The capture hotkey can be changed under the settings accessed from the main menu  .
.

Input Mappings
You can change input settings and mappings from the controls window which can be accessed from the REM4P PC main window. Refer to the Input Controls section of the guide for more details on input mappings and settings.

App Settings
App Settings
- Check for updates on launch – When enabled the app will check for updates when started and notify you to update the app.
- UI Scaling – This controls the size of the user interface, if you find anything too big or small you can adjust it here. Requires a restart of the app.
- Gamepad hotkey – This sets the hotkey used for capturing keyboard/mouse input. To set a new hotkey simply click inside the text box and press the desired keys.
- Install Steam shortcut – This will install a custom Steam shortcut to REM4P PC to allow Steam controller support. Steam must be running before this can be run.
- Logout – This will log the current user out of the application. Will force close the application.
Input, Mappings & Controls
Troubleshooting
Known Crash Causes
The software listed below are known to cause crashes due to attempted injection and manipulation of audio/video/overlays. If you are encountering a crash please make sure you have disabled these.
- MSI Nahimic audio tools
- Asus Strix OSD
- Asus ROG OSD
Input Issues
- If you encounter any issues with your keyboard/mouse outside of REM4P PC then you can remove the drivers easily from the shortcut menu

- If your assigned hotkey doesn’t work you can always regain control by exiting the game or using the backup hotkey ALT+F12
- If your keyboard/mouse input isn’t working please check you don’t have a physical Dualshock or Xbox controller connected to your PC. These can confuse the game into thinking there are multiple gamepads and therefore ignoring REM4P input.
If none of the above solutions work for you please post a new topic in the support section of the forum with details on the exact issue and your PC specifications.